Table of Contents
A simple explanation to Azure Resource Groups
Azure Resource Groups in Azure is a new approach to group the collection of assets in the logical groups for easy and automatic monitoring, provisioning, and access control.
The key benefit of using the Azure resource groups is the grouping related resources that belong to an application together.
These resources actually share a unified lifecycle from creation to usage, and then re-provisioning finally.
Let’s understand what are Azure resources groups in deep and what can we do with it?
A resource group is the container of resources.
Therefore, it holds the resources you assign from the deployment whether it is a database, website, or VM.
It enables you to group these entities.
Whenever we create a virtual machine in Azure, it is necessary to allocate it to an Azure resource group.
What are the Azure Resource Groups?
These groups are actually the logical collections of storage accounts, virtual machines, web apps, databases, or database servers.
The Azure Resource management model involves resource groups, management groups, subscriptions, and resources.
These all are essential organizational constructs.
Azure resource manager serves as an essential component of the deployment process in Microsoft Azure.
Before moving further it is important to understand the Azure resource management model.
Understanding resource management hierarchy
The Azure resource manager model uses four levels or scopes involving:
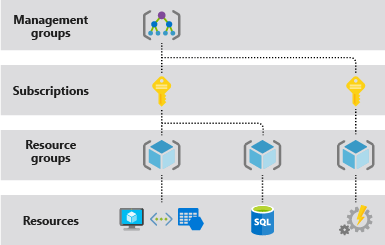
Management Groups
In actuality, these groups are the containers that will help you manage the access, policy, and compliance for subscriptions.
All the subscriptions available in the management group obtain all the conditions applied to management groups automatically.
Subscriptions
The subscription associates user accounts and resources which were created by these user accounts.
Each subscription has limits on the number of resources created.
The subscriptions are used to manage costs and resources created by users, projects, or teams in any organization.
Resource Group
This is a logical container into which all the Azure resources, Such as, web pages, virtual machines, databases, and storage accounts are managed and deployed.
Resources
These are the instances of services that you create like SQL databases, VMs, storage, and more.
How to use Azure resource groups?
When you are organizing resource groups.
So, it is important to know about all the resources in a group which should have the same life-cycle.
Let’s understand it with an example:
If an application requires different resources that need to be updated together like a web app, SQL server, or the mobile app, then it makes sense to combine these resources in the same resource group.
However, it is important to use different resource groups for staging, production, or test.
As the resources in these groups have different lifecycles.
Important things to consider while building Azure list of resource groups:
- The new resources can be added or deleted from an Azure Resource Group
- All the resources cannot be moved to different resource groups
- The resources you include in resource groups can be located in different Azure regions
- You should use resource groups
Azure Resource Groups For Effectively Governance
Azure resource groups are a versatile tool for role-based access control (RBAC).
This will also allow you to grant user access at the group level.
Apart from this, Azure resource groups simplify billing and reporting.
Azure resource group permissions help you follow the principle of some restrictions or the least privilege to access.
Furthermore, this means that we can provide users, applications, and processes with minimum permissions needed at the resource group level.
However, for instance, the strategy for encryption key management applies at the management group level.
But the start/stop scheduling procedure applies to the resource group level with some restrictions.
The effective use of tagging allows you to identify resources in the resource groups for automation, technical, billing, and security purposes.
Be sure to apply tagging best practices before deploying any resource.
Administrator RBACs applies in the hierarchy while giving access to all resource groups and resources within each group.
Similarly, the governing policies relating t performance, cost, and security also apply at any level depending on the scope of the policy.
Simplifies cost management
Azure Resource Groups provide ready-made structures for cost allocation.
So, these groups make it easy to identify the costs at the project level.
Though, you can do it manually too.
Placing the resources in the same resource group is actually a way to group them for usage in the billing records.
Furthermore, to understand cost allocation in the Azure environment,.
Simply grouping them by resource group is the right way to filter and sort the data.
Therefore, this helps you to understand the cost of resources in the Azure system.
With regards to cost management.
It is possible to assign the Azure resource group location tag (cost allocation tag) and the cost of running the resources within the whole group.
Apart from this, you can simply delete the group whenever the resources are not required.
How to create a resource group?
In order to create a resource group in Azure:
- Log in to the Azure portal using your Microsoft user name and password.
- Here you will see a unified dashboard for all the assets.
- Now it’s important to validate that all the subscriptions are included to which you are having access at present and all the resource groups and the associated groups.
- Click on the resource groups from the menu of services to access resource groups.
- Now it’s time to click add to create a new resource group
- Now you have to add the resource group name and Azure resource group location.
- You have to select the location of the Microsoft Azure data center from which you intend to deploy vSRX VM.
- Specify the location where the majority of your resources reside. Or select the location which is closest.
- Click create and now the resource group might take a few seconds to create