Exchange Server 2016/19 Installation Step By Step
Learn How To Install Exchange 2016 or Exchange 2019
Table of Contents
Exchange Server 2016/19 Installation
This article explains the Exchange Server 2016/19 installation step by step
In this article, we will install Exchange Server 2016/19 on Windows Server 2016/19, before this, we have to install Exchange prerequisites.
Therefore, after installing the Exchange Server 2016 prerequisites or Exchange 2019 Prerequisites
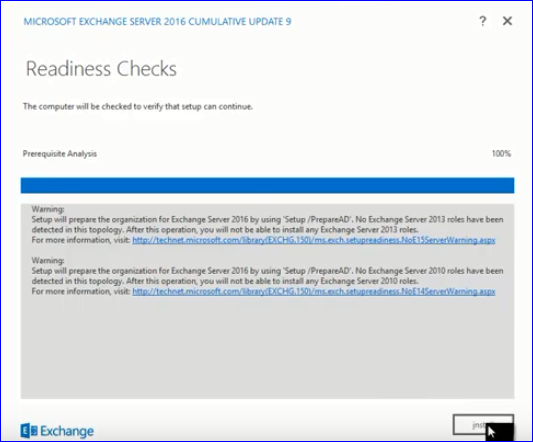
Make sure you are logged in with the admin account with the permission of the enterprise and schema admin.
Before installing the exchange server on your Windows 2016/19 server.
There are a few things to keep in mind.
However, you need to Extend your Active directory schema
Step 1: Why it is necessary to extend the AD Schema
Exchange stores a lot of information in Active Directory itself.
Therefore, before getting ready for the Exchange Server it is necessary to update classes and other attributes, to begin with.
You can do this by extending your AD Schema.
This step will make your organization ready for the Exchange Server Environment.
Before preparing an active directory, you should have the following in place.
.Net framework 4.7.2
Visual C++ Redistributable Package for Visual Studio 2012
Install-windows feature RSAT-ADDSTo perform the above action.
One should have to log in as a member of Enterprise and Schema Security Group Admins.
Open the Command prompt locate the setup.exe file for your Exchange and run the following command.
Setup.exe /PrepareSchema /IAcceptExchangeServerLicenseTerms
Note: Assuming our Exchange server setup files are in D drive.
Execute the below command on the global catalog server
Example: D:\Exchange\Setup.exe /PrepareSchema /IAcceptExchangeServerLicenseTerms
After following the above step,
Now Active Directory schema has been extended.
you need to wait till it starts replicating with all other domain controllers.
You can use the Repadmin command to confirm whether replication has been started or not.
Step 2: Exchange server Active Directory Preparation
Now you have to prepare an active directory (AD)
Preparing the active directory puts other extra items to create objects, containers, attributes, etc in AD.
You need the same credentials to perform this task as well
Run the following command:
Setup.exe /PrepareAllDomains /IAcceptExchangeServerLicenseTermsExample:
D:\Exchange\Setup.exe /PrepareAD /OrganizationName:"<organization name>"
/IAcceptExchangeServerLicenseTerms
Step 3: Exchange server 2016/19 AD Domains Preparation
Now the final step is to prepare active directory domains.
It will prepare every active directory domain where the exchange will be installed.
It will set the permission for other additional containers, attributes, and security groups to access the exchange server.
However, you can prepare your all domains for exchange by the following command.
Setup.exe /PrepareAllDomains /IAcceptExchangeServerLicenseTermsExample:
Setup.exe /PrepareAllDomains /IAcceptExchangeServerLicenseTermsNote: If you are using a single domain name for your exchange server 2016 & not using any subdomain
Therefore, all the above steps will be completed automatically by the setup process of the exchange server.
For Mailbox Server Role: Run the following cmdlet in PowerShell
Install-WindowsFeature NET-Framework-45-Features, Server-Media-Foundation, RPC-over-HTTP-proxy, RSAT-Clustering, RSAT-Clustering-CmdInterface, RSAT-Clustering-Mgmt, RSAT-Clustering-PowerShell, WAS-Process-Model, Web-Asp-Net45, Web-Basic-Auth, Web-Client-Auth, Web-Digest-Auth, Web-Dir-Browsing, Web-Dyn-Compression, Web-Http-Errors, Web-Http-Logging, Web-Http-Redirect, Web-Http-Tracing, Web-ISAPI-Ext, Web-ISAPI-Filter, Web-Lgcy-Mgmt-Console, Web-Metabase, Web-Mgmt-Console, Web-Mgmt-Service, Web-Net-Ext45, Web-Request-Monitor, Web-Server, Web-Stat-Compression, Web-Static-Content, Web-Windows-Auth, Web-WMI, Windows-Identity-Foundation, RSAT-ADDSFor Edge Transport Role:
Install-WindowsFeature ADLDSOnce all the above steps are done you can launch the Exchange server setup and select the role you want to install on your Exchange server.
Other Considerations for Your Exchange Server
Some other important things to keep in mind that, after installing the exchange server. and creating user, groups inside your email system.
Email can flow inside your organization.
Therefore, if you want them to send and receive from the outer world.
You need to set the appropriate Internal and external DNS settings and send the connector.
Also, the MX record setup is necessary and should point to your exchange server to receive emails from the outside world.
You can also set your different internal and external URLs to access your email server within the organization or from the outside world.
For more clearance watch the following video for the exchange server 2016 installation step by step
For any help and assistance, feel free to email at info@techijack.com