Exchange Server PowerShell Script | To Configure Virtual Directories
Quickly Set Internal and External URLs to Exchange Virtual Directory
Table of Contents
Exchange Server PowerShell Script to Configure Virtual Directories
You can use Exchange Server PowerShell Script to configure virtual directories quickly.
After installing the Microsoft Exchange Server, the first step is to configure your virtual directories.
Microsoft Exchange Virtual directories have two types of URLs, Internal URLs, and External URLs
Therefore, in order to set the internal and external URLs for the virtual directory in the Exchange Server
You have to plan for the namespace according to your Exchange Server DNS settings
By default, these URLs are set to the Exchange server name and the local DNS
For Example, Our local domain DNS name is Techijack.local
So all the virtual directories will be set by default with this .local domain name.
However, if we want to connect to Exchange server from outside with OWA and Microsoft Outlook
We have to set the Public DNS name in External URLs so that users can connect from outside the organization.
Our Scenario for Techijack Exchange Server Organization
As our local domain in Techijack.local and our Public Domain is Techijack.live
The name of our Microsoft Exchange Server 2019 is EX01
So, currently, our Virtual directories URLs have been set as follows
| Service | Virtual Directories URL |
|---|---|
| AutoDiscover | https://EX01.techijack.local/Autodiscover/Autodiscover.xml |
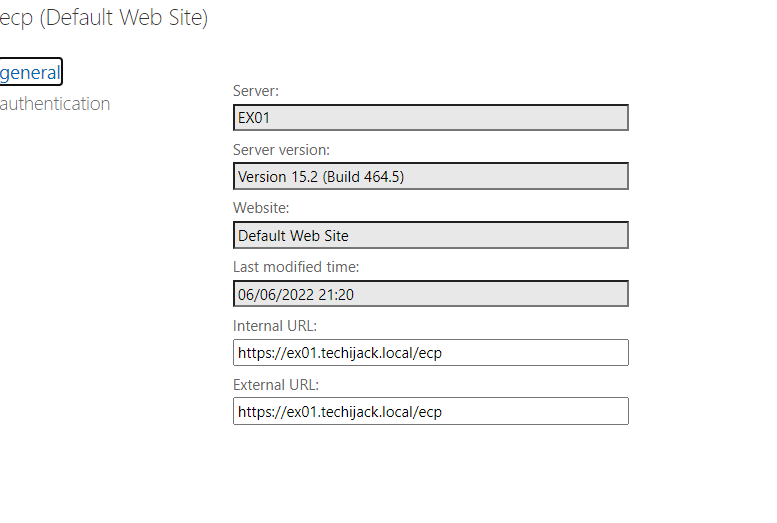
| Exchange Control Panel | https://EX01.techijack.local/ecp |
| Exchange Web Services | https://EX01.techijack.local/EWS/Exchange.asmx |
| Exchange ActiveSync | https://EX01.techijack.local/Microsoft-Server-ActiveSync |
| Offline Address Book | https://EX01.techijack.local/OAB |
| Outlook Web App | https://EX01.techijack.local/owa |
| MAPI over HTTP | https://EX01.techijack.local/mapi |
| Outlook Anywhere | EX01.techijack.local |
So, by using the above Virtual directories URLs we can’t connect with Exchange Server from outside.
So, we have an External zone in our DNS by the name of our public domain i.e Techijack.live
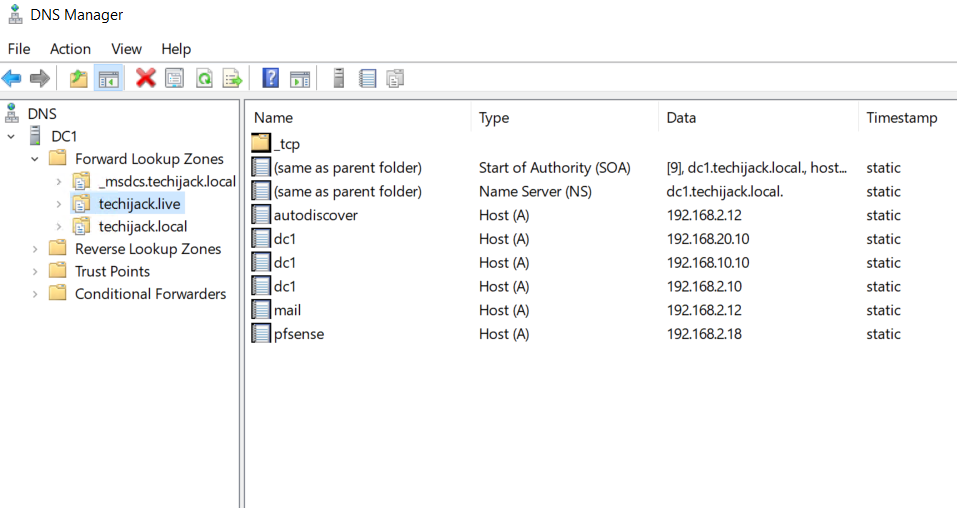
Now we want all the virtual directories to set the public DNS name.
Our namespace will be mail. techijack.com and we want all the External and Internal URLs to be the following
| Service | Virtual Directories URL |
|---|---|
| AutoDiscover | https://mail.techijack.live/Autodiscover/Autodiscover.xml |
| Exchange Control Panel | https://mail.techijack.live/ecp |
| Exchange Web Services | https://mail.techijack.live/EWS/Exchange.asmx |
| Exchange ActiveSync | https://mail.techijack.live/Microsoft-Server-ActiveSync |
| Offline Address Book | https://mail.techijack.live/OAB |
| Outlook Web App | https://mail.techijack.live/owa |
| MAPI over HTTP | https://mail.techijack.live/mapi |
| Outlook Anywhere | mail.techijack.live |
How To Create and Run Exchange Server PowerShell Script
Now we are planning to create and run the Exchange Server PowerShell Script to configure all the URLs in one go.
In order to configure the URL manually one by one, we have to use the following cmdlet for each service.
ECP : Get-ECPVirtualDirectory -Server EX01 | Set-ECPVirtualDirectory -InternalURL "https://mail.techijack.live/ecp" -ExternalURL "https://mail.techijack.live/ecp"
OWA : Get-OWAVirtualDirectory -Server $Server_name | Set-OWAVirtualDirectory -InternalURL "https://mail.techijack.live/owa" -ExternalURL "https://mail.techijack.live/owa"
OAB : Get-OABVirtualDirectory -Server $Server_name | Set-OABVirtualDirectory -InternalURL "https://mail.techijack.live/oab" -ExternalURL "https://mail.techijack.live/oab"
ActiveSync : Get-ActiveSyncVirtualDirectory -Server $Server_name | Set-ActiveSyncVirtualDirectory -InternalURL "https://mail.techijack.live/Microsoft-Server-ActiveSync" -ExternalURL "https://mail.techijack.live/Microsoft-Server-ActiveSync"
EWS : Get-WebServicesVirtualDirectory -Server $Server_name | Set-WebServicesVirtualDirectory -InternalURL "https://mail.techijack.live/EWS/Exchange.asmx" -ExternalURL "https://mail.techijack.live/EWS/Exchange.asmx"
Mapi : Get-MapiVirtualDirectory -Server $Server_name | Set-MapiVirtualDirectory -InternalURL "https://mail.techijack.live/mapi" -ExternalURL https://mail.techijack.live/mapi
However, if we create a script for this, every time we add a new server, we must run the script to configure the virtual directory.
Also, if you have multiple servers, same time you can run the script on all the servers.
Powershell Script To Configure Exchange Server Virtual Directories
With the help of the above cmdlet for each service, we will try to create a PowerShell Script.
So, First, we will set the variable for the Computer Name of the Exchange Server and NameSpace which we want to set.
Therefore, our variables are
$Server_Name = “EX01”
$FQDN = “mail.techijack.com”
Now in the place of the server name, we will put $Server_name and $FQDN at the place of the namespace
Our script will look like this below
$Server_name = "EX01"

$FQDN = "mail.techijack.live"

Get-OWAVirtualDirectory -Server $Server_name | Set-OWAVirtualDirectory -InternalURL "https://$($FQDN)/owa" -ExternalURL "https://$($FQDN)/owa"

Get-ECPVirtualDirectory -Server $Server_name | Set-ECPVirtualDirectory -InternalURL "https://$($FQDN)/ecp" -ExternalURL "https://$($FQDN)/ecp"

Get-OABVirtualDirectory -Server $Server_name | Set-OABVirtualDirectory -InternalURL "https://$($FQDN)/oab" -ExternalURL "https://$($FQDN)/oab"

Get-ActiveSyncVirtualDirectory -Server $Server_name | Set-ActiveSyncVirtualDirectory -InternalURL "https://$($FQDN)/Microsoft-Server-ActiveSync" -ExternalURL "https://$($FQDN)/Microsoft-Server-ActiveSync"

Get-WebServicesVirtualDirectory -Server $Server_name | Set-WebServicesVirtualDirectory -InternalURL "https://$($FQDN)/EWS/Exchange.asmx" -ExternalURL "https://$($FQDN)/EWS/Exchange.asmx"

Get-MapiVirtualDirectory -Server $Server_name | Set-MapiVirtualDirectory -InternalURL "https://$($FQDN)/mapi" -ExternalURL https://$($FQDN)/mapi

Set-ClientAccessService -Identity $Server_name -AutodiscoverServiceInternalURI https://$FQDN/Autodiscover/Autodiscover.xml

$OWA = Get-OWAVirtualDirectory -Server $Server_name -AdPropertiesOnly | Select InternalURL,ExternalURL
$ECP = Get-ECPVirtualDirectory -Server $Server_name -AdPropertiesOnly | Select InternalURL,ExternalURL
$OAB = Get-OABVirtualDirectory -Server $Server_name -AdPropertiesOnly | Select InternalURL,ExternalURL
$EAS = Get-ActiveSyncVirtualDirectory -Server $Server_name -AdPropertiesOnly | Select InternalURL,ExternalURL
$MAPI = Get-MAPIVirtualDirectory -Server $Server_name -AdPropertiesOnly | Select InternalURL,ExternalURL
$Auto_Discover = Get-ClientAccessServer $Server_name | Select AutoDiscoverServiceInternalUri
$OWA,$ECP,$OAB,$EAS,$MAPI | ft
$Auto_Discover
Once the above script will be executed, your virtual directories will be configured, along with Autodiscover.
Moreover, it will also display the result of external and internal URLs, which were set by the script.
Note: This script is valid for only one server, you have to modify the script to run for multiple servers.
Also, you have to change the computer name and FQDN name according to your scenario.
Furthermore, pls watch the video below to configure the Exchange server virtual Directory
Moreover, if you want to learn complete Exchange Server Administration you can register for the Exchange Server course