How to Configure Storage Space Direct
Storage Space Direct (S2D) Setup On Windows Server 2025
Table of Contents
How to configure Storage Space Direct on Windows Server 2025
How to configure Storage Space Direct in Windows Server 2025
If you are looking to learn how to configure Storage Space Direct to make your environment highly available,
In this post, I will walk you through deploying and configuring Storage Space Direct (S2D) in a simple two-node converged cluster.
S2D can have powerful features when it comes to highly available and deploying Virtual Machines in a highly available storage.
You can perform a live migration of a virtual machine without interrupting anything.
Run your workload on a converged VM and make it highly available.
What is Storage Space Direct (S2D)
Imagine you have a few servers in your office.
Each server has its own hard drives or SSDs. Normally, those drives can only be used by that single server.
Storage Spaces Direct (S2D) is a Windows Server feature that lets you combine all those separate drives into one big, shared, and reliable storage system.
It’s like taking the storage from all your servers, putting it together, and making it act like a single, powerful storage box.
If one server or one disk fails, your data stays safe because S2D automatically keeps copies on other servers
Therefore, it is perfect for virtual machines, reducing the SAN Cost
Also, it is fast, reliable, highly available, and easily scalable too.
Storage Space Direct Prerequisites
Two or more servers running Windows Server Datacenter Edition (2019/2022/2025).
Each server should have:
At least 1 SSD or NVMe (for cache) and an additional 4 HDD/SSD for capacity.
Two NICs (1 Gbps or better — 10/25 GbE recommended for production).
Domain-joined servers with proper DNS and Active Directory setup.
Failover Clustering & Hyper-V features available (will install them below).
Remote management rights (PowerShell/Server Manager).
Latest Windows updates installed.
For enterprise setup, check the hardware requirements
NOT SUPPORTED: RAID controller cards that don’t support direct pass-through of SAS physical storage devices or SAN (Fibre Channel, iSCSI, FCoE) storage. Host-bus adapter (HBA) cards must implement simple pass-through mode for any storage devices used for Storage Spaces Direct.
Role and Feature Needed for S2D
Install-WindowsFeature -Name FS-FileServer, Failover-Clustering, Hyper-V, Data-Center-Bridging, RSAT-Clustering-PowerShell, Hyper-V-PowerShell -IncludeManagementTools –Restart
Our Scenario
Here we will create a two-node cluster, our operating system is Windows Server 2025 Datacenter edition.
Our Hyper-V node names are Node1 and Node2, and the Cluster Name is FirstCluster
We are using a Dell-420 server as a host and have three Virtual machines installed on it.
One is a Domain controller by the name of MYDC01, and the other two are cluster nodes, by the names of Node1 and Node 2

We have enabled the nested VM environment to create a VM inside the VM.
Therefore, 3 virtual network cards are assigned to the Node1 and Node2 VMs
If you have the same configuration and want to enable nested virtualization.
You can run the following command to enable it.
Set-VMProcessor -VMName "YourVMName" -ExposeVirtualizationExtensions $trueNote: Run the following command on the main host, not on the VM. Also, make sure that your VM is in a shut-off state.
Steps for How to Configure Storage Space Direct
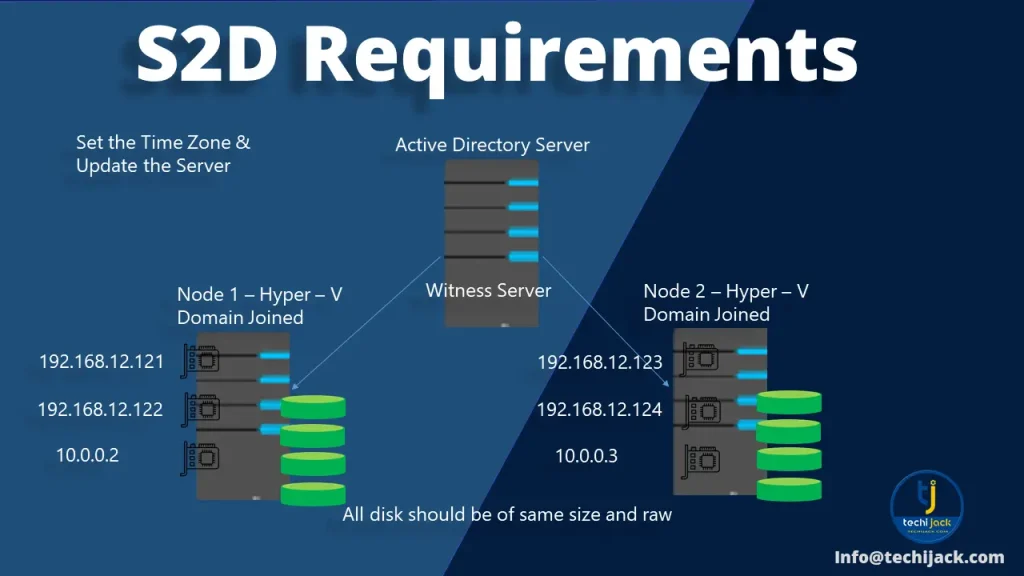
First, make sure that both nodes are joined to the Active Directory Domain.
All the servers have the same time zone set and are fully updated.
Also, there are multiple network cards installed, a minimum of two.
Moreover, you have at least four disks installed on each server apart from the operating system.
All the storage disks should be raw and clean with no prior partition.
Network Setup for S2D
Here we have three network cards on our node1 and node2 with the following IP Addressing
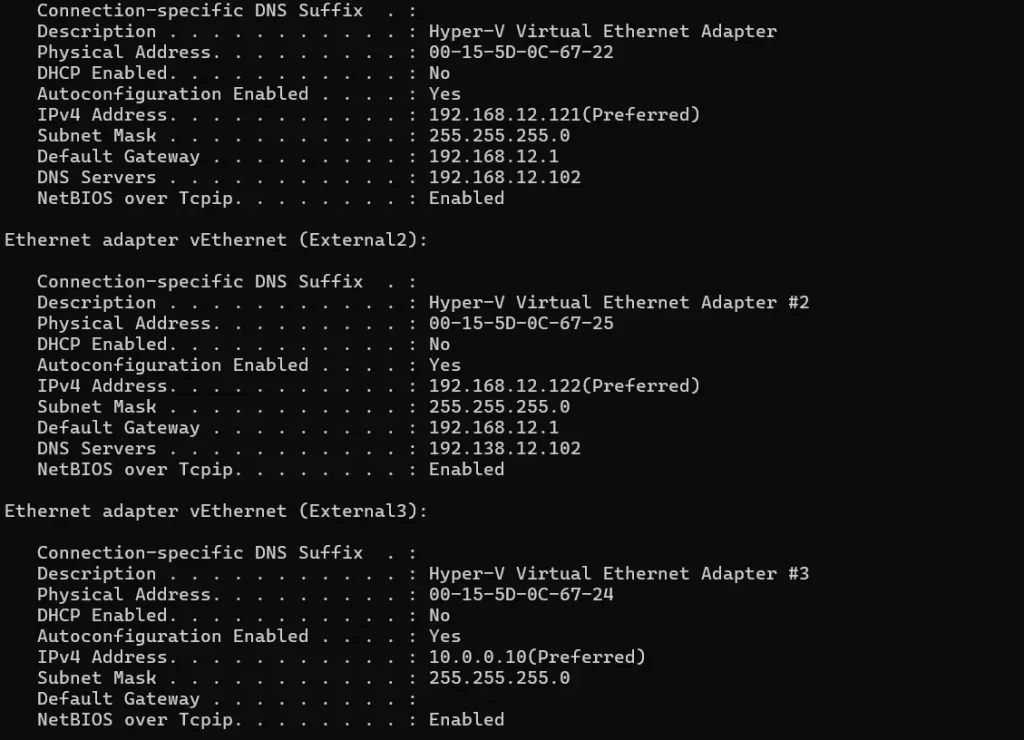
Node 1 Node 2
192.168.12.121 192.168.12.123
192.168.12.122 192.168.12.124
10.0.0.10 10.0.0.3
Subnet 192.168.12.0/24 is for the virtual machine traffic
Therefore, subnet 10.0.0.0/24 is dedicated to the live migration of virtual machines
Note: Enable the RDMA for your network card if available (RDMA Capable Network Card is Recommended)
Cleaning the Attached Drives
Before you enable Storage Spaces Direct, ensure your drives are empty: no old partitions or other data is there
Run the following cmdlet to clean the drives
# Fill in these variables with your values
$ServerList = "Node1", "Node2"

foreach ($server in $serverlist) {
    Invoke-Command ($server) {
        # Check for the Azure Temporary Storage volume
        $azTempVolume = Get-Volume -FriendlyName "Temporary Storage" -ErrorAction SilentlyContinue
        If ($azTempVolume) {
            $azTempDrive = (Get-Partition -DriveLetter $azTempVolume.DriveLetter).DiskNumber
        }

# Clear and reset the disks
        $disks = Get-Disk | Where-Object {
            ($_.Number -ne $null -and $_.Number -ne $azTempDrive -and !$_.IsBoot -and !$_.IsSystem -and $_.PartitionStyle -ne "RAW")
        }
        $disks | ft Number,FriendlyName,OperationalStatus
        If ($disks) {
            Write-Host "This action will permanently remove any data on any drives other than the operating system boot drive!`nReset disks? (Y/N)"
            $response = read-host
            if ( $response.ToLower() -ne "y" ) { exit }

$disks | % {
            $_ | Set-Disk -isoffline:$false
            $_ | Set-Disk -isreadonly:$false
            $_ | Clear-Disk -RemoveData -RemoveOEM -Confirm:$false -verbose
            $_ | Set-Disk -isreadonly:$true
            $_ | Set-Disk -isoffline:$true
        }

#Get-PhysicalDisk | Reset-PhysicalDisk

}
        Get-Disk | Where-Object {
            ($_.Number -ne $null -and $_.Number -ne $azTempDrive -and !$_.IsBoot -and !$_.IsSystem -and $_.PartitionStyle -eq "RAW")
        } | Group -NoElement -Property FriendlyName
    }
}
Testing and Creating the Cluster
Before proceeding with cluster creation, make sure to validate the cluster by running the following cmdlet.
Test-Cluster -Node Node1, Node2 -Include “Storage Spaces Direct”, “Inventory”, “Network”, “System Configuration
Once you have found that everything is fine, you can create the cluster and assign a static IP to it by running the following cmdlet
New-Cluster -Name FirstCluster -Node Node1,Node2 -NoStorage -StaticAddress 192.168.12.25After creating the cluster, create a witness server.
Here, we used our DC computer as a witness server.
Finally, now enable the Storage Space Direct by the following cmdlet
Enable-ClusterStorageSpacesDirect -CimSession FirstClusterOptionally enable the CSV cache by running the following cmdlet
$ClusterName = "FirstCluster"
$CSVCacheSize = 1024 #Size in MB
Write-Output "Setting the CSV cache..."
(Get-Cluster $ClusterName).BlockCacheSize = $CSVCacheSize
$CSVCurrentCacheSize = (Get-Cluster $ClusterName).BlockCacheSize
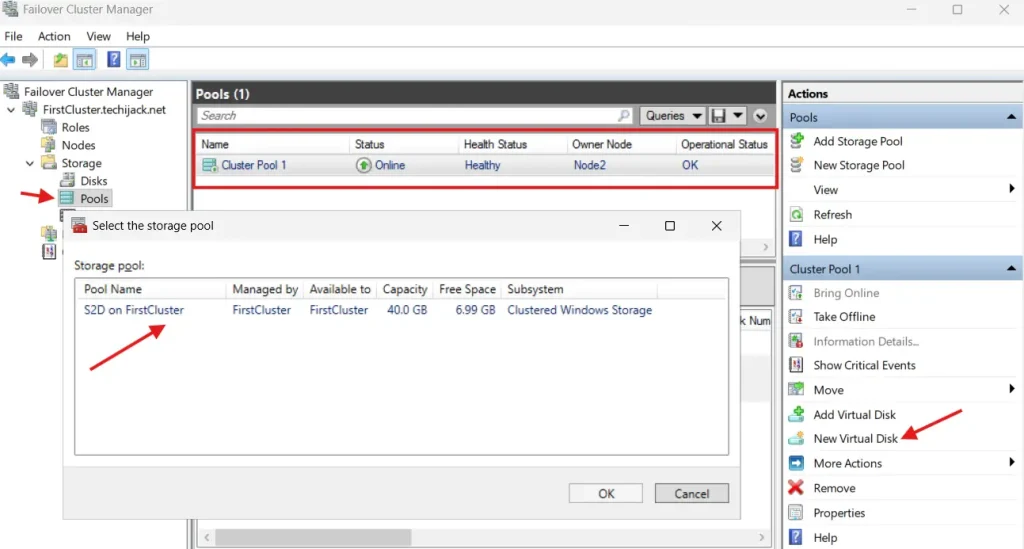
Write-Output "$ClusterName CSV cache size: $CSVCurrentCacheSize MB"Once this is done, check the pool inside the failover cluster
Create a Virtual Drive and Volume
Now the cluster has been created
The next step is to create the virtual disk volume.
You can create the virtual disk by clicking on New Virtual Disk from the failover cluster, and then create a mirrored volume and format it.
Now you have a mirrored volume, and you can convert it to CSV storage.
After that, you can create a converged virtual machine on that storage for the highly available VM.
Moreover, if your VM is created, you can test the live migration from Node1 to another and vice versa.
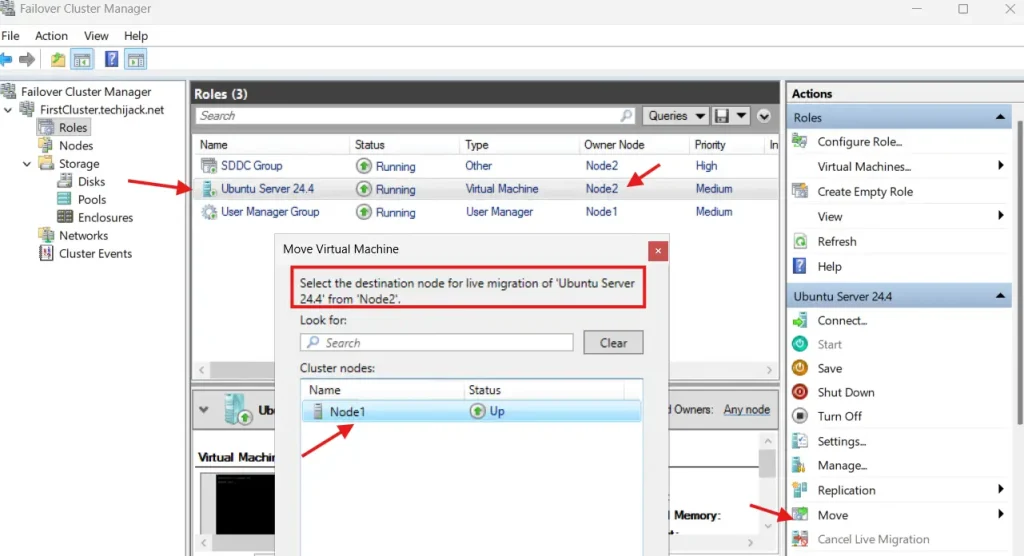
If that goes successfully, you have configured the Storage Space Direct properly.
Conclusion
Storage Space can help you achieve a highly available environment for storage, and you can also install virtual machines on that storage, which is highly available, and you can perform live migration without any downtime.
Therefore, you can also create a scale-out file server and create a highly available network share.
Also, you may like other Windows Server tutorials
In case of any issue related to this post, feel free to contact us at info@techijack.com
Moreover, if you want to see the complete post in action.
Watch the YouTube video below for the Steps for how to configure Storage Space Direct Step by Step on Windows Server 2025 – 2 node S2D Cluster