How to Set Up SMTP Anonymous Relay Email
Set Up SMTP Anonymous Email on Exchange Server 2019
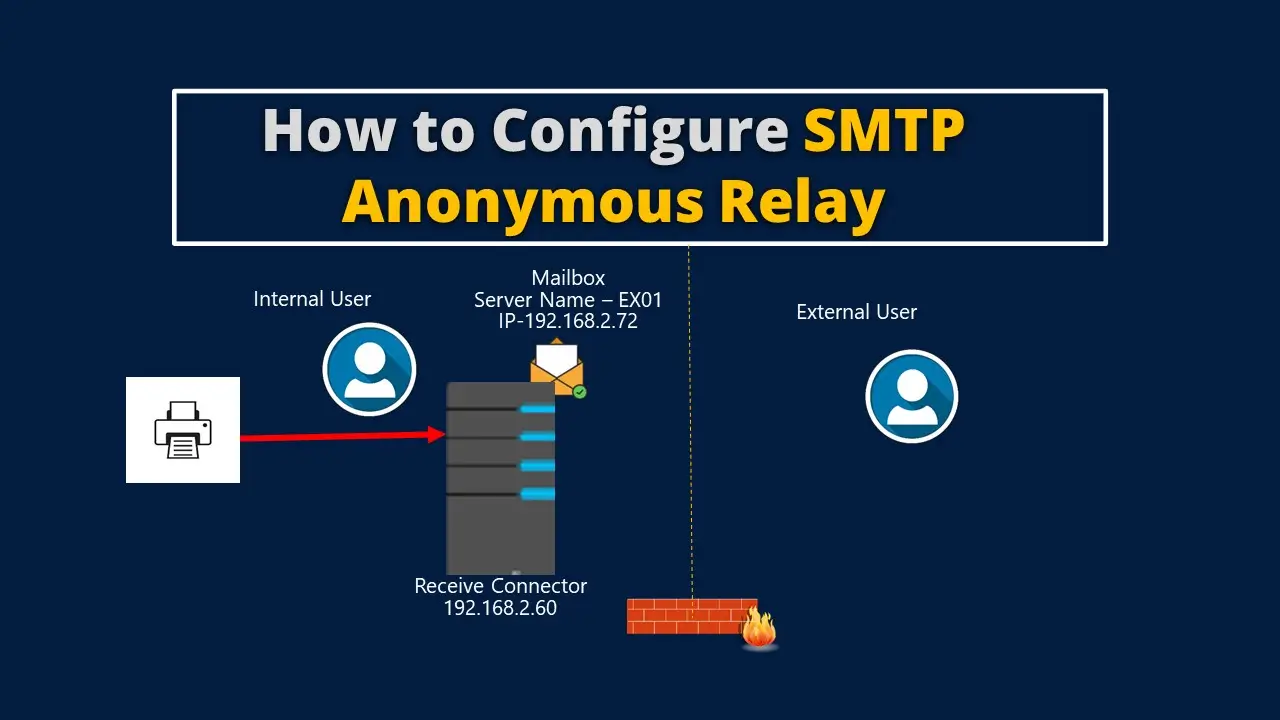
Table of Contents
How to Set up SMTP Anonymous Relay Email on Exchange 2019
If you need an SMTP relay and want to know how to set up an SMTP anonymous relay email in the Exchange Server.
In this article we will check the requirement of an anonymous relay connector, and why it is needed.
Also, we will configure the SMTP Anonymous relay for Exchange 2019
Therefore, we will also know why open relay is not recommended.
First of all, let’s know why open relay is harmful.
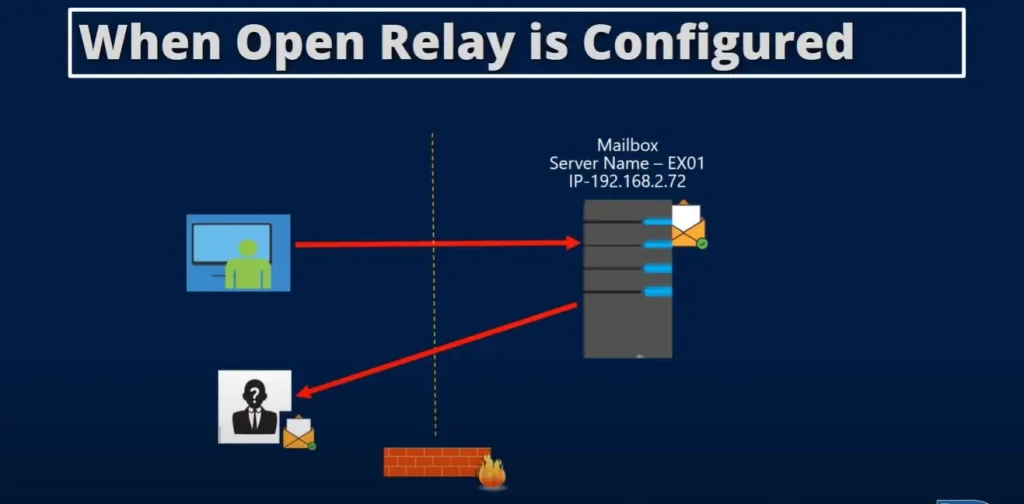
What is an Open Relay?
If by mistake you configure your Microsoft Exchange Server as an open relay.
It has many bad impacts on the reputation of your domain, Server, and IP you are using to send and receive emails.
With the help of Open Relay, anyone can send email messages to anyone using your Exchange Server.
Also, spammers can exploit your server by connecting with it and sending spam messages through your MX records.
So, you should never set up your Exchange Server as an open relay to prevent outsiders from exploiting your Server for sending malicious emails.
How to check Exchange Server is configured as an Open Relay
The easiest way to check this is the Microsoft connectivity analyzer tool.
Another method is telnet.
Install the telnet on any Windows Server
Open the Command Prompt and type telnet yourdomain.com 25
Here in our case, we are using our internal domain so we type telnet mail.cwp.inside 25 and hit enter
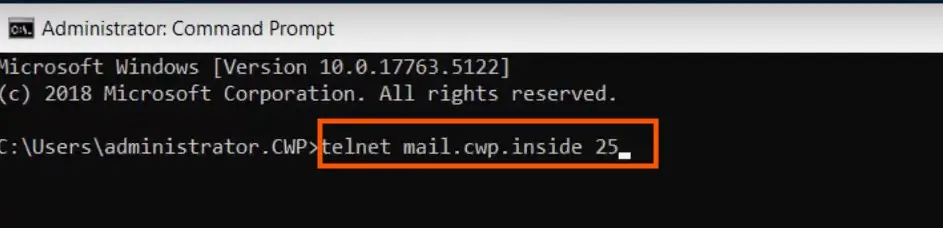
You will be connected to your Exchange Server through telnet.
Now type EHLO
Type MAIL FROM: <abc.anydomain.com> as a random user
You will see the sender is ok.
Now type RCPT TO:test@gmail.com
It will throw an error 550 5.7.54 SMTP; Unable to relay recipient in non-accepted domain
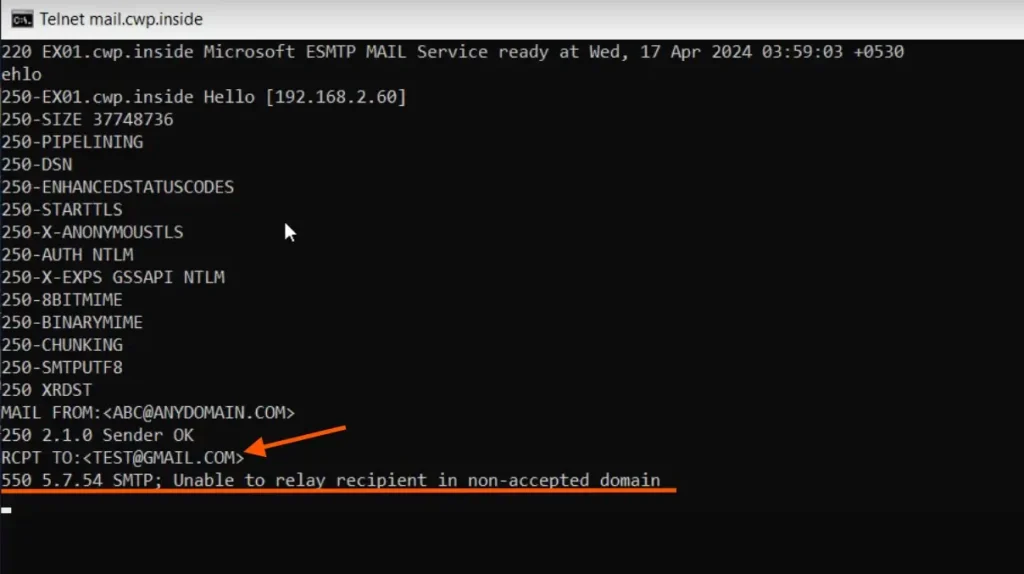
If you get this error message that means the user does not belong to our Exchange Server accepted domains and Exchange Server is not configured as an open relay.
Need of SMTP Anonymous Relay
In many cases, you need to configure SMTP Anonymous relay.
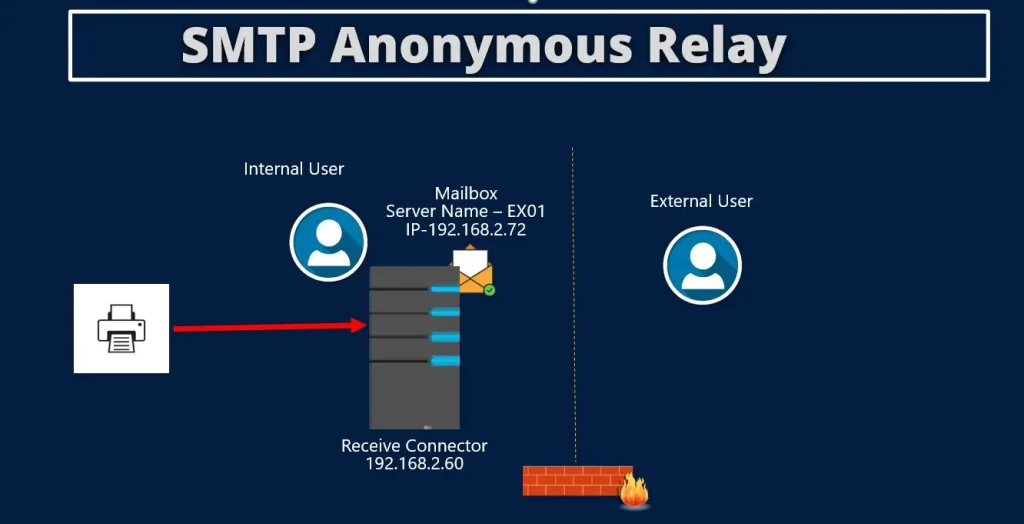
For Example, if you are using a smart backup solution, printer, or any internal web application where you want the notification email to know the status.
In this scenario, you need an SMTP anonymous relay to configure to receive notifications from the devices or applications.
Configuring anonymous relays correctly will secure your email flow and will save the server from exploitation.
You can securely create the receive connector bonded with IP to send messages to internal and external users.
How to configure SMTP Anonymous Relay In Exchange
As we already tested, our server is not configured as an open relay or an anonymous relay.
So, we will create a receive connector to configure an anonymous relay on our Exchange Server 2019.
Here we are using a device with the IP 192.168.2.60, only this device will be allowed to send anonymous email messages.
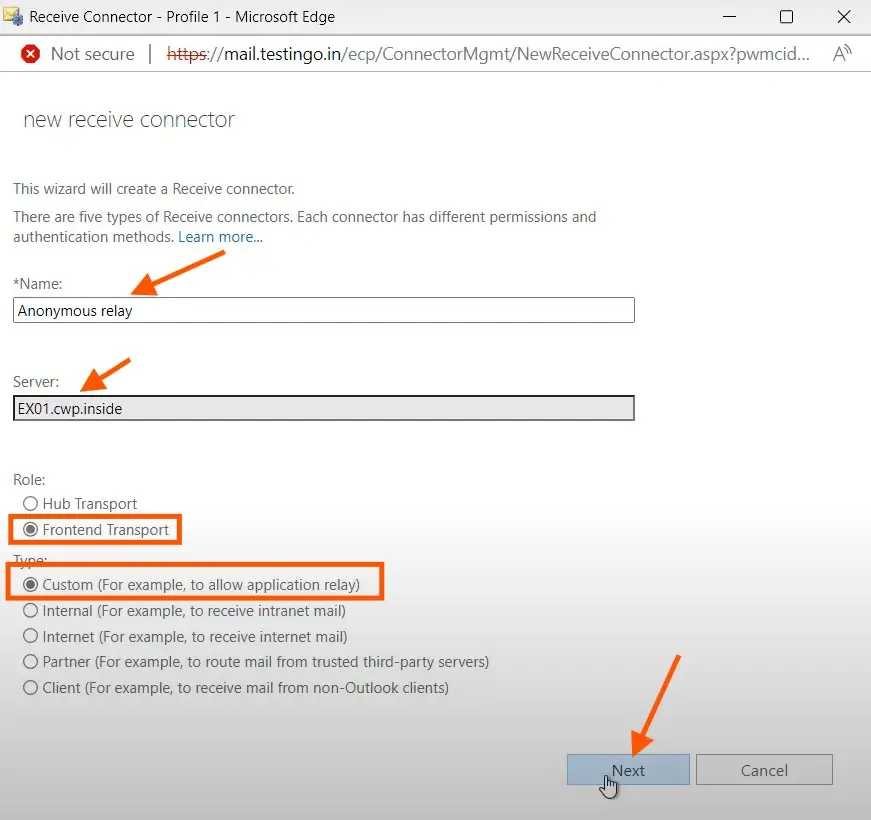
To create an SMTP Anonymous relay connector, go to Exchange Admin Center, navigate to Receive Connector, and click on the plus + sign to new receive connector.
Name the connector as Anonymous Relay, choose the role as Frontend Transport
Select the type as custom to allow application relay and click on Next
Next, you will see the network adapter bindings on port 25, keep it as default and click on Next
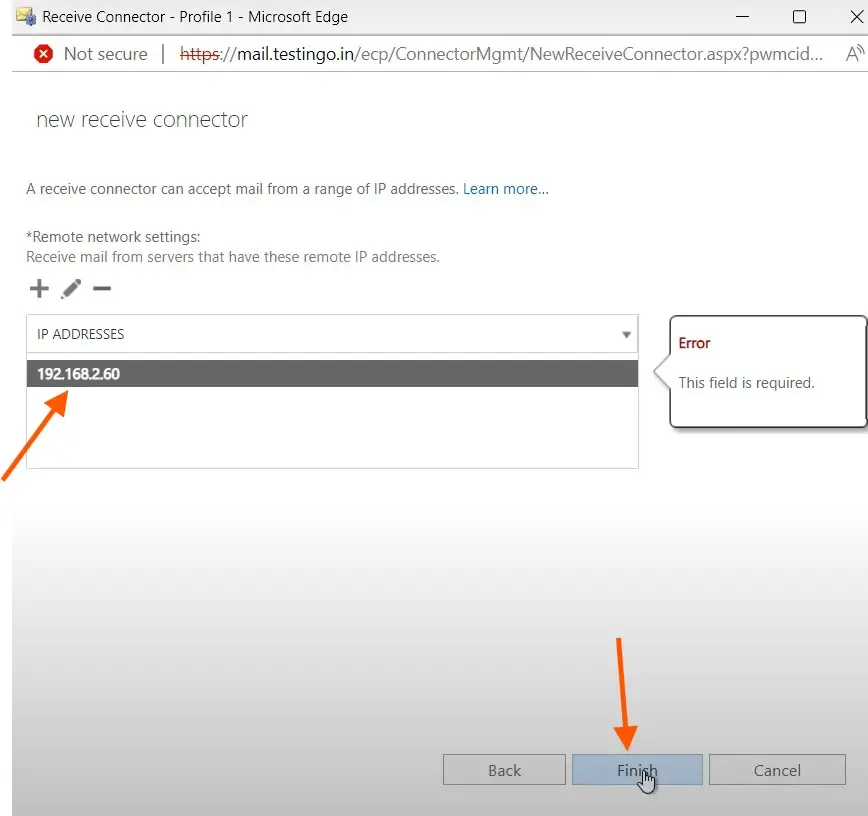
Now you will get the screen for remote network settings pre-configured for all the ip addresses
Here we have to remove this default IP by clicking on the – sign and add only the IP of your device from which you want to allow the anonymous relay and click on finish.
As in our case it is 192.168.2.60, so we will add this IP
Note: Make sure to put your only allowed device IPs, if you keep it as default, it will configure it as an open relay.
To create a receive connector for an anonymous relay via the Exchange management shell, run the following cmdlet.
New-ReceiveConnector -Name anonymous relay -TransportRole FrontendTransport -Custom -Bindings <LocalIPAddresses>:25 -RemoteIpRanges 192.168.2.60Make sure to choose the connector name and IP according to your devices.
We have successfully created the receive connector for our SMTP Anonymous relay.
Therefore, we also need to configure the permission for our newly created Anonymous Relay receive connector.
Configuring Permission for Anonymous Relay
Now we need to set the permission for our anonymous relay.
We are going to set the permission as anonymous
Also, we will configure connections as externally secured.
To configure the connections as anonymous run the following cmdlet
Set-ReceiveConnector "Anonymous Relay" -PermissionGroups AnonymousUsersGet-ReceiveConnector "Anonymous Relay" | Add-ADPermission -User "NT AUTHORITY\ANONYMOUS LOGON" -ExtendedRights "Ms-Exch-SMTP-Accept-Any-Recipient"To configure the connections as externally secured, run the following cmdlet
Set-ReceiveConnector "Anonymous Relay" -AuthMechanism ExternalAuthoritative -PermissionGroups ExchangeServersTherefore, to confirm the settings you made you can verify the configuration of the receive connector by the following cmdlet
Get-ReceiveConnector "Anonymous Relay" | Format-List Enabled,TransportRole,Bindings,RemoteIPRangesAnd to verify the permission run the cmdlet
Get-ADPermission "Anonymous Relay" -User "NT AUTHORITY\ANONYMOUS LOGON" | where {($_.Deny -eq $false) -and ($_.IsInherited -eq $false)} | Format-Table User,ExtendedRights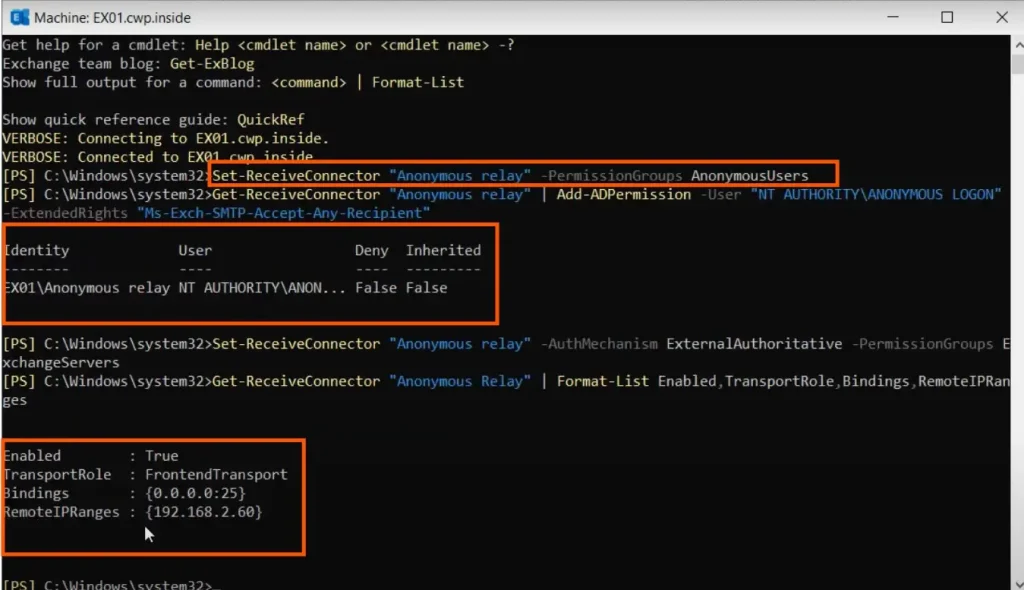
So, we have successfully configured the anonymous SMTP relay and also set the permissions to our dedicated receive connector.
Testing Anonymous Relay
We have configured the required settings and permissions.
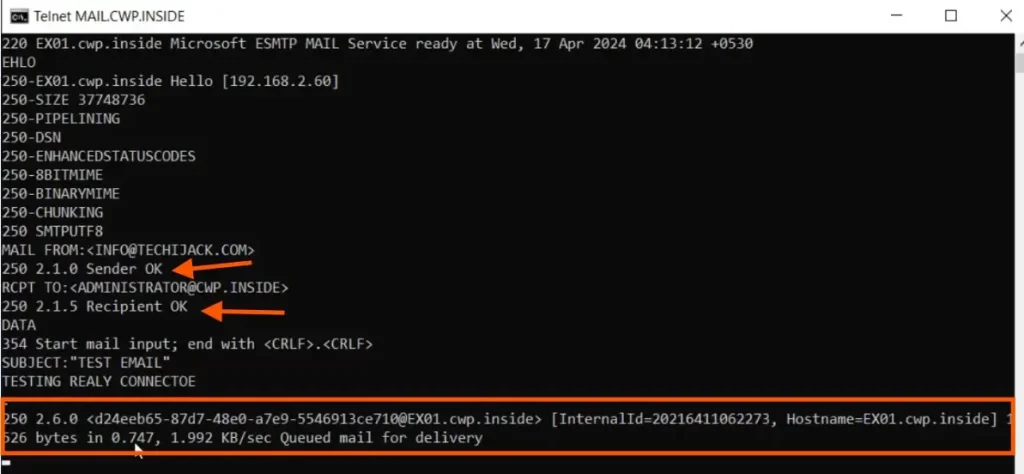
Now let’s try to connect with telnet from our device IP 192.168.2.60
You can see that, we have successfully connected the sender and recipient both are Ok
Therefore, we send a send email with the subject Test Email from info@techijack.com to Administrator@cwp.inside
As a result, we can see the Queued Mail for Delivery.
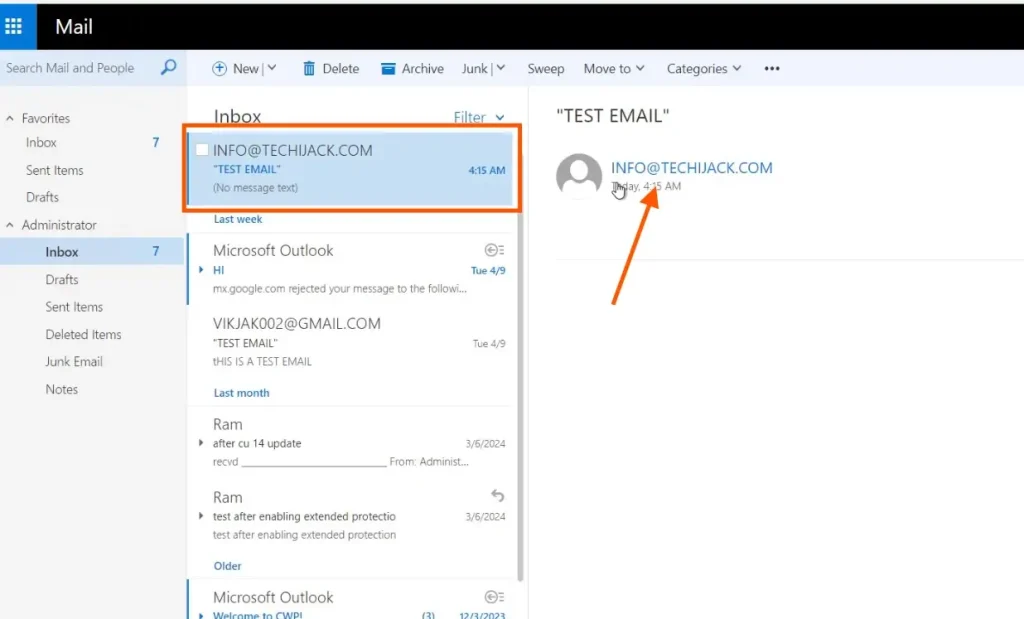
Now if we go and see the mailbox for the Administrator, we can see that we received an email from info@techijack with the subject Test Email
Conclusion
In this article, we learned how to create an SMTP anonymous relay connector on Exchange Server 2019 to send secure email from allowed devices.
Make sure to check the IPs and only allow the IP for the devices you want to allow for anonymous relay.
Also, check not to set the Exchange as an open relay.
Therefore, if you have any queries related to this post, feel free to contact us.
You may also like other Microsoft Exchange Tutorials
Moreover, To see the article in action, watch the video below to configure the SMTP anonymous relay.