Exchange Extended Protection | How to Enable
Configure Extended Protection On Exchange Server 2019
Table of Contents
Enable Exchange Extended Protection
Enable Exchange Extended Protection for Exchange Server Security to run your server smoothly.
Exchange extended Protection is enabled by default on Exchange 2019 CU 14 and later.
If you do not implement Exchange Extended protection carefully and upgrade your Exchange to CU 14.
Some serious issues may occur with the Exchange, such as the user not being able to log on to Exchange 2019 after updating to CU 14.
Therefore, you can implement the proper setting for Exchange Extended Protection to secure your Exchange organization.
Microsoft recommends that Every Exchange user enable it.
In this article, we will learn about how to enable extended protection for Exchange Server 2019.
What is Extended Protection?
It enhances the security of existing authentication methods in Windows Server to protect from Authentication relay or Man-in-the-middle attacks.
This is accomplished by using security information that is implemented through channel-binding information specified through a Channel Binding Token (CBT) which is primarily used for TLS connections.
However, it is enabled by default on Exchange 2019 CU 14
You can enable extended protection on older versions of Exchange with the PowerShell Script provided by Microsoft i.e ExchangeExtendedProtectionManagement.ps1
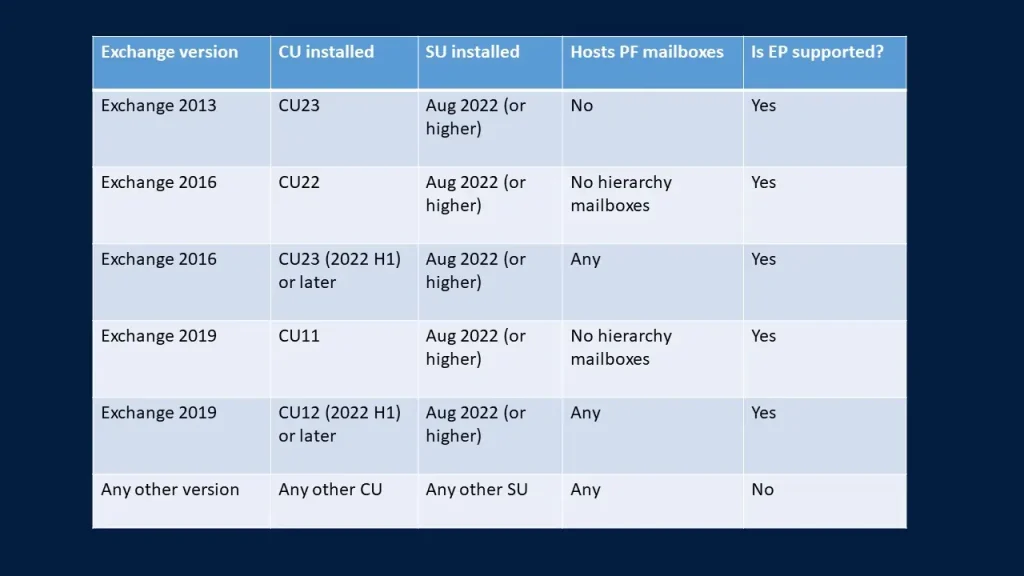
Prerequisites for Exchange Versions that support Extended Protection
Exchange 2013, 2016, and 2019 supports EP
For Exchange 2016 and 2019, you must be running on 2022 H1 CU
Before enabling it, you must install at least August 2022 SU or later.
For Exchange 2013, you must be running on CU 23 with August 2022 SU or later.
SSL offloading should be disabled
Should user NTLMv2
Make sure all Exchange Server uses TLS 1.2 with best practices.
Affected Scenario with Extended Protection
- SSL offloading is not supported, so you should not use SSL offloading with a load balancer, use SSL bridging instead.
- You can use the same SSL on your load balancers when using SSL bridging on your load balancer.
- You cannot enable Extended Protection for Exchange 2013 with a Public folder in a co-existing environment.
- Cannot be enabled if using Exchange 2016 CU 22 or Exchange 2019 CU 11 which hosts a public folder hierarchy.
- If you have the above scenario, upgrade Exchange 2016 to CU 23 and Exchange 2019 to CU 12 or later.
- EP cannot be fully configured on Exchange Servers that are published with Hybrid Agent.
- Check the Exchange Latest CU & SU
For more clearance see the image below.
Know Extended Protection Status for Your Exchange
Before enabling the EP it is best approach to know the status first.
To know the status we can run the Exchange Health Checker Script and generate the HTML report
So, we ran the script to know the status of EP on our Exchange Server 2019 and got the below result.
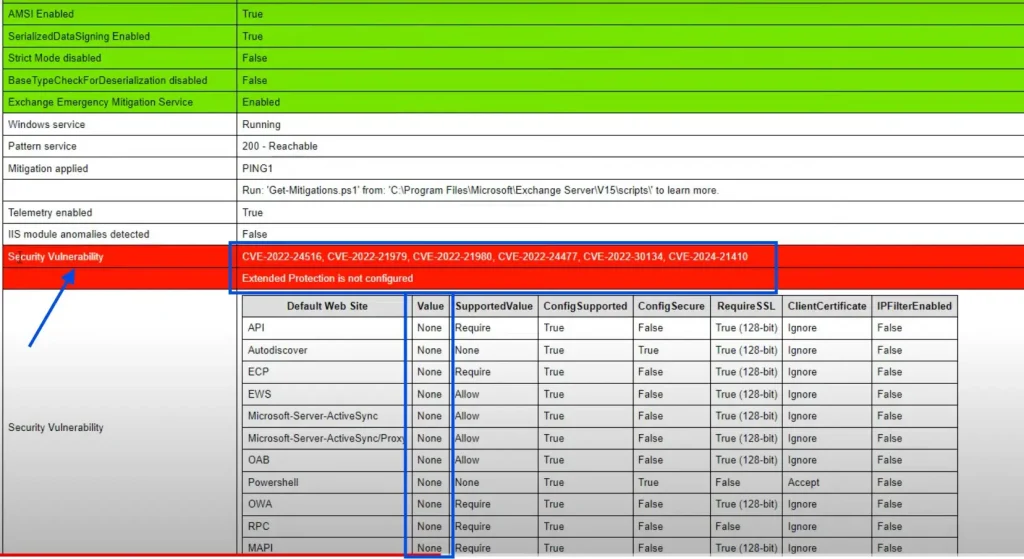
The above image indicates that EP is not configured and we have vulnerabilities for CVE-2022-24516, 21979, 21980, 24477, and 30134, and the value is set as none for our virtual directories
Therefore, to check the Extended Protection status, you can also run the PowerShell script.
Download ExchangeExtendedProtectionManagement.ps1 script from GitHub
Save the script in the script folder inside the C drive and navigate to the script folder in the Exchange management shell.
Now run the following cmdlet to know the status of EP
.\ExchangeExtendedProtectionManagement.ps1 –ShowExtendedProtectionYou will get the result as below
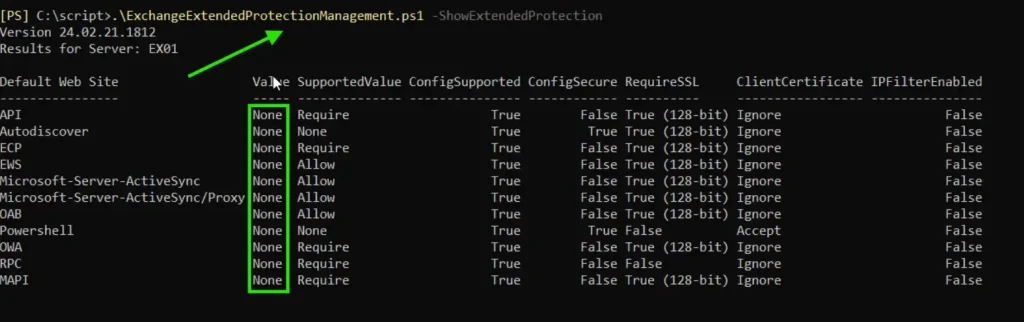
You can see we got the same result as with the HTML report showing a value of none for virtual directories.
How to Enable Extended Protection in Exchange Server
If you are updated to the required version you can enable the Exchange Extended Protection.
Before enabling EP see the best practice approach to configure Exchange TLS 1.2 Setting.
Here we consider that TLS 1.2 is already configured.
So, we need to disable the SSL offloading for Outlook Anywhere for all Exchange Server in the organization.
To disable it run the following cmdlet in EMS (Exchange Management Shell)
Set-OutlookAnywhere "EX01-2019\RPC (Default Web Site)" -SSLOffloading $false
Now we can run the ExchangeExtendedProtectionManagement.ps1 script to configure Extended protection on our Exchange Server.
Make sure that, you have the Organization Management rights to perform the task.
We have downloaded the script in the same script folder inside the c drive and navigated to the script folder in EMS.
To run the script run the following cmdlet
.\ExchangeExtendedProtectionManagement.ps1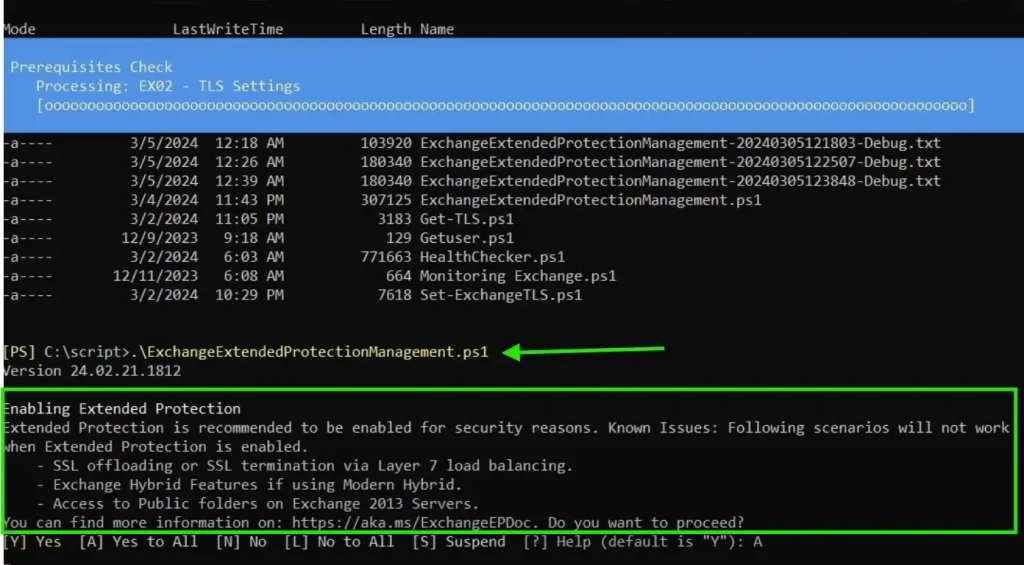
Now it will start the configuration of extended protection on all the Exchange Server in your organization.
Therefore, it will also check the TLS prerequisites, and SSL Offloading and will configure EP.
Once it is configured, you will see the screen below that says, Extended Protection is configured successfully.
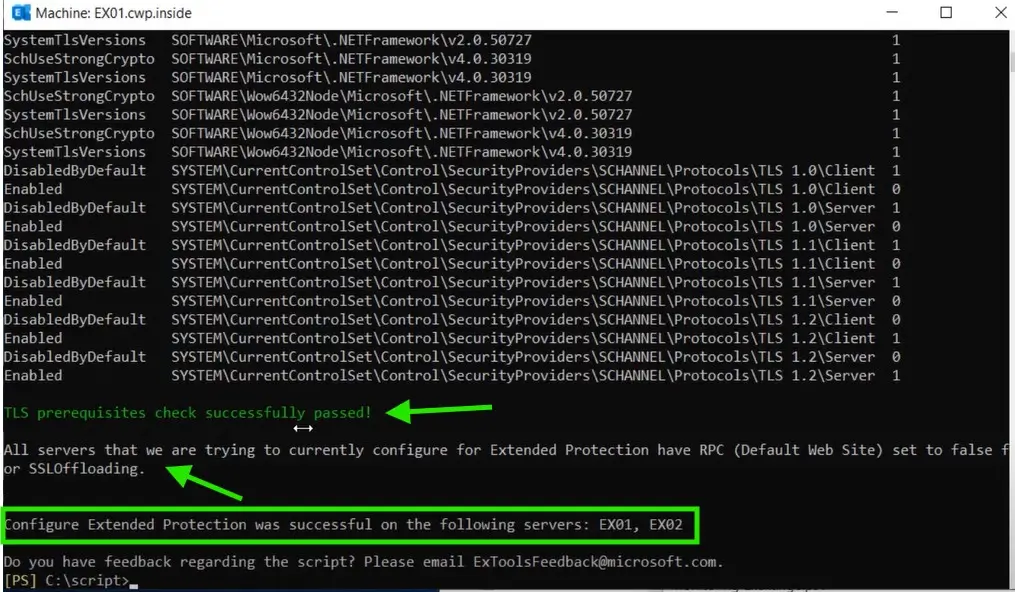
you can see the TLS Prerequisites passed successfully and SSL Offloading is also disabled.
Verifying the Status of EP
We have successfully configured Extended Protection for our Two Server EX01 and EX02
Let’s verify it with the PowerShell
We will run the same cmdlet as we ran earlier to check the status
.\ExchangeExtendedProtectionManagement.ps1 –ShowExtendedProtectionWe will see the result below
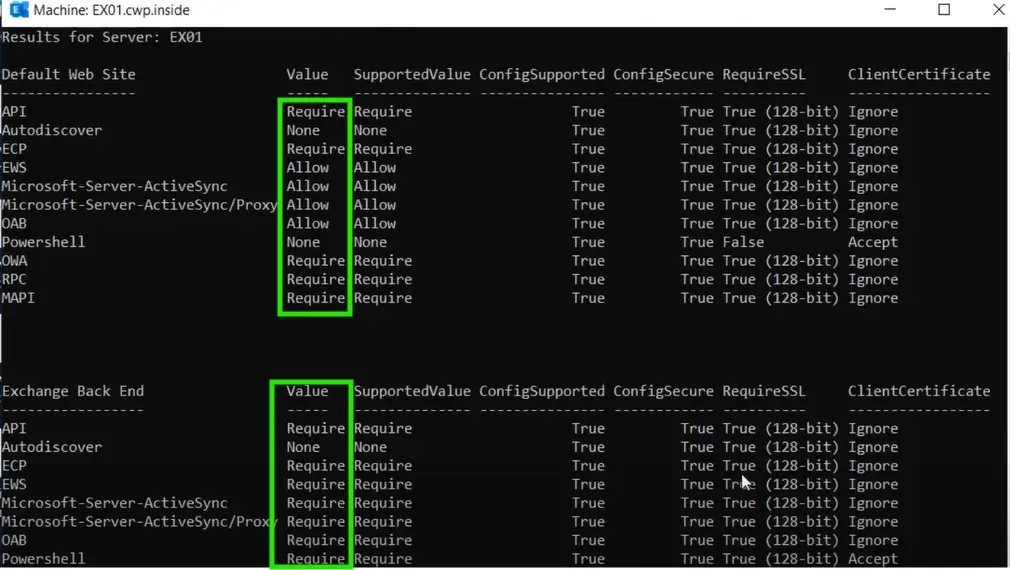
You can see now we have the values configured for our virtual directories.
Therefore, we can also confirm it by checking with the Exchange Health Checker script.
Once you run the script, you will get the following result.

Now you can see that, Extended Protection is enabled successfully.
You can check your mail flow to confirm whether everything is working fine or not.
Disabling and Rolling Back Exchange EP
Disabling the EP will set all current configured values to none
To disable the EP on all the Exchange Server in your organization run the following cmdlet
.\ExchangeExtendedProtectionManagement.ps1 –DisableExtendedProtectionTherefore, if you want to disable it for a specific server, then you have to run the following cmdlet
.\ExchangeExtendedProtectionManagement.ps1 -DisableExtendedProtection -ExchangeServerNames EX01, EX02You can also run the following cmdlet to roll back the EP settings.
.\ExchangeExtendedProtectionManagement.ps1 -RollbackType "RestoreIISAppConfig"
Conclusion
In this article, we learned how to configure extended protection for Exchange Server 2019.
Whenever you are enabling EP for your Exchange organization, make sure to meet the prerequisites by enabling TLS 1.2 and updating your Exchange to the latest CU.
If things go wrong, you still have the option to disable the EP or roll it back to the previous stage.
If you are interested in learning more see the Free Microsoft Exchange Tutorials
Moreover, if you want to see the article in action, watch the video below to configure EP for Your Exchange 2019