
Table of Contents
How to create a Facebook page for business, Step by step guide
How To Create A Facebook Page: Today, Facebook has over 2.5 billion active users monthly.
And, as a small business owner and brand manager, you will get a good chance to reach and connect with your target audience through a Facebook page.
So, where should one start? And, is there any procedure to follow?
If your brand has a Facebook business page, then it becomes easier for people to discover your brand and products easily.
Creating a Facebook page doesn’t seem a difficult process.
If you already have all the photos, ideas, and texts, it might take a few simple steps to get your page up and running.
There are more than 140 million other businesses that have started using the Facebook business page to connect with the target audience.
So, let’s understand how to start a Facebook business page?
How to create a Facebook business page?
Before creating a Facebook business page, you need to login into your personal Facebook account.
But you need not worry as the information from your personal Facebook page will not be visible on the business page.
So, if you are creating a business account on Facebook, log in to your personal account, and then move to the page creation step.
Fill out your basic business info
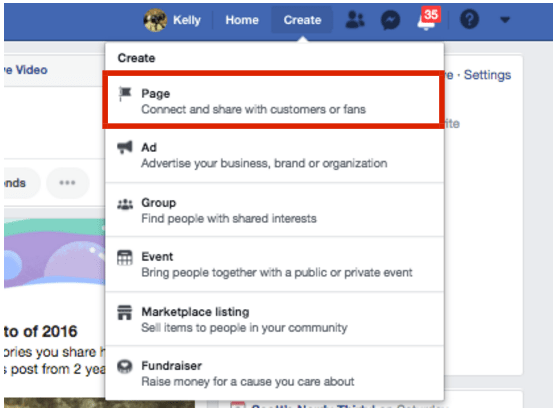
Open the following URL to create your Facebook business page:
(You can also click on the drop-down menu in the upper right corner of your Facebook page and then select create a page.)
Once you are there, you have to select the type of page you want to create: Business/brand, or community/public.
Since we are creating a Facebook page for business, click on the “Business or Brand” box.
Here you will have to fill out a few fields including:
- Page Name
- Categories
- Address
- Phone number
- Use your business or company name for your page name. Otherwise, you may enter the name that people are likely to search for when they are trying to search for your business.
- For category, type a word or two to describe your business. Facebook will also suggest some options; choose the one your customers are most likely to think of about your business.
- Once you choose the category, you have to enter further details like Address and phone number. You may choose whether to make this information public or to show only the state or city.
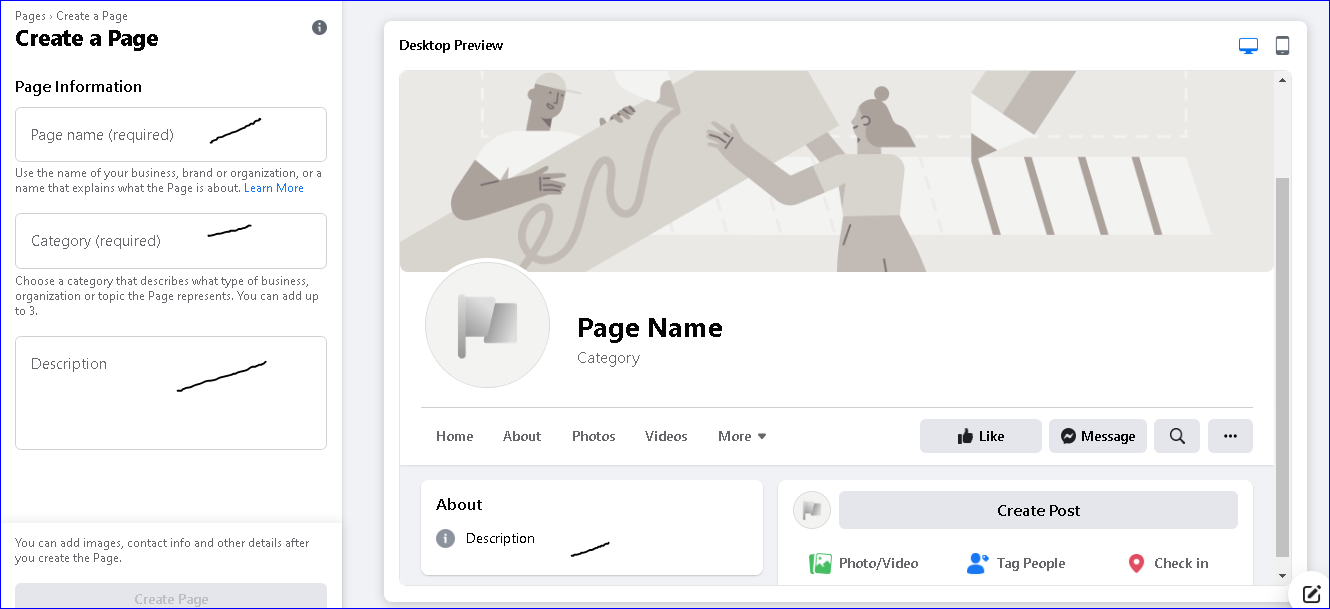
Keep in mind that you can change the category and other information (but not the name) later on if required.
Add a profile photo & cover photo for your Facebook business page
Next, Facebook will ask you to upload a profile and cover photo for your business.
It’s important to create a good visual impression on the customers. So, choose the images carefully.
Make sure to choose the images which align with your brand and identify your business.
Profile photo
You have to upload the profile photo first. If you have a recognized brand, using your business logo is the perfect and safest way to go.
However, if you are a local business, try a well-shot image of your signature product or services.
The ideal size for your profile photo on the business page is of size 170×170 pixels on a desktop and 128×128 pixels on mobile.
Square dimensions are the best, and Facebook will crop it into a circular shape in ads.
Once you have chosen the right image, click upload profile photo.
Cover photo
Now, it’s time to choose the cover photo. It is the most prominent image on your Facebook business page and an opportunity to deliver a visual statement that supports your brand.
The best dimensions for the Facebook cover page are 820×462 pixels.
According to Facebook, your cover photo is displayed in different sizes on desktop and mobile.
The dimensions for desktop image are 820×312 pixels, and for smartphone are 640×360 pixels.
Once, you have selected the appropriate cover photo, click upload a cover photo.
You have a dedicated Facebook page now, but, it’s not visible to the public yet.
Create a username for your page
Creating a user name for your page makes it easier for people to find your business.
You can give a custom URL that you can share with others.
Your username is also called your Vanity URL.
The length of the vanity URL could be up to 50 characters. Make it easy to remember.
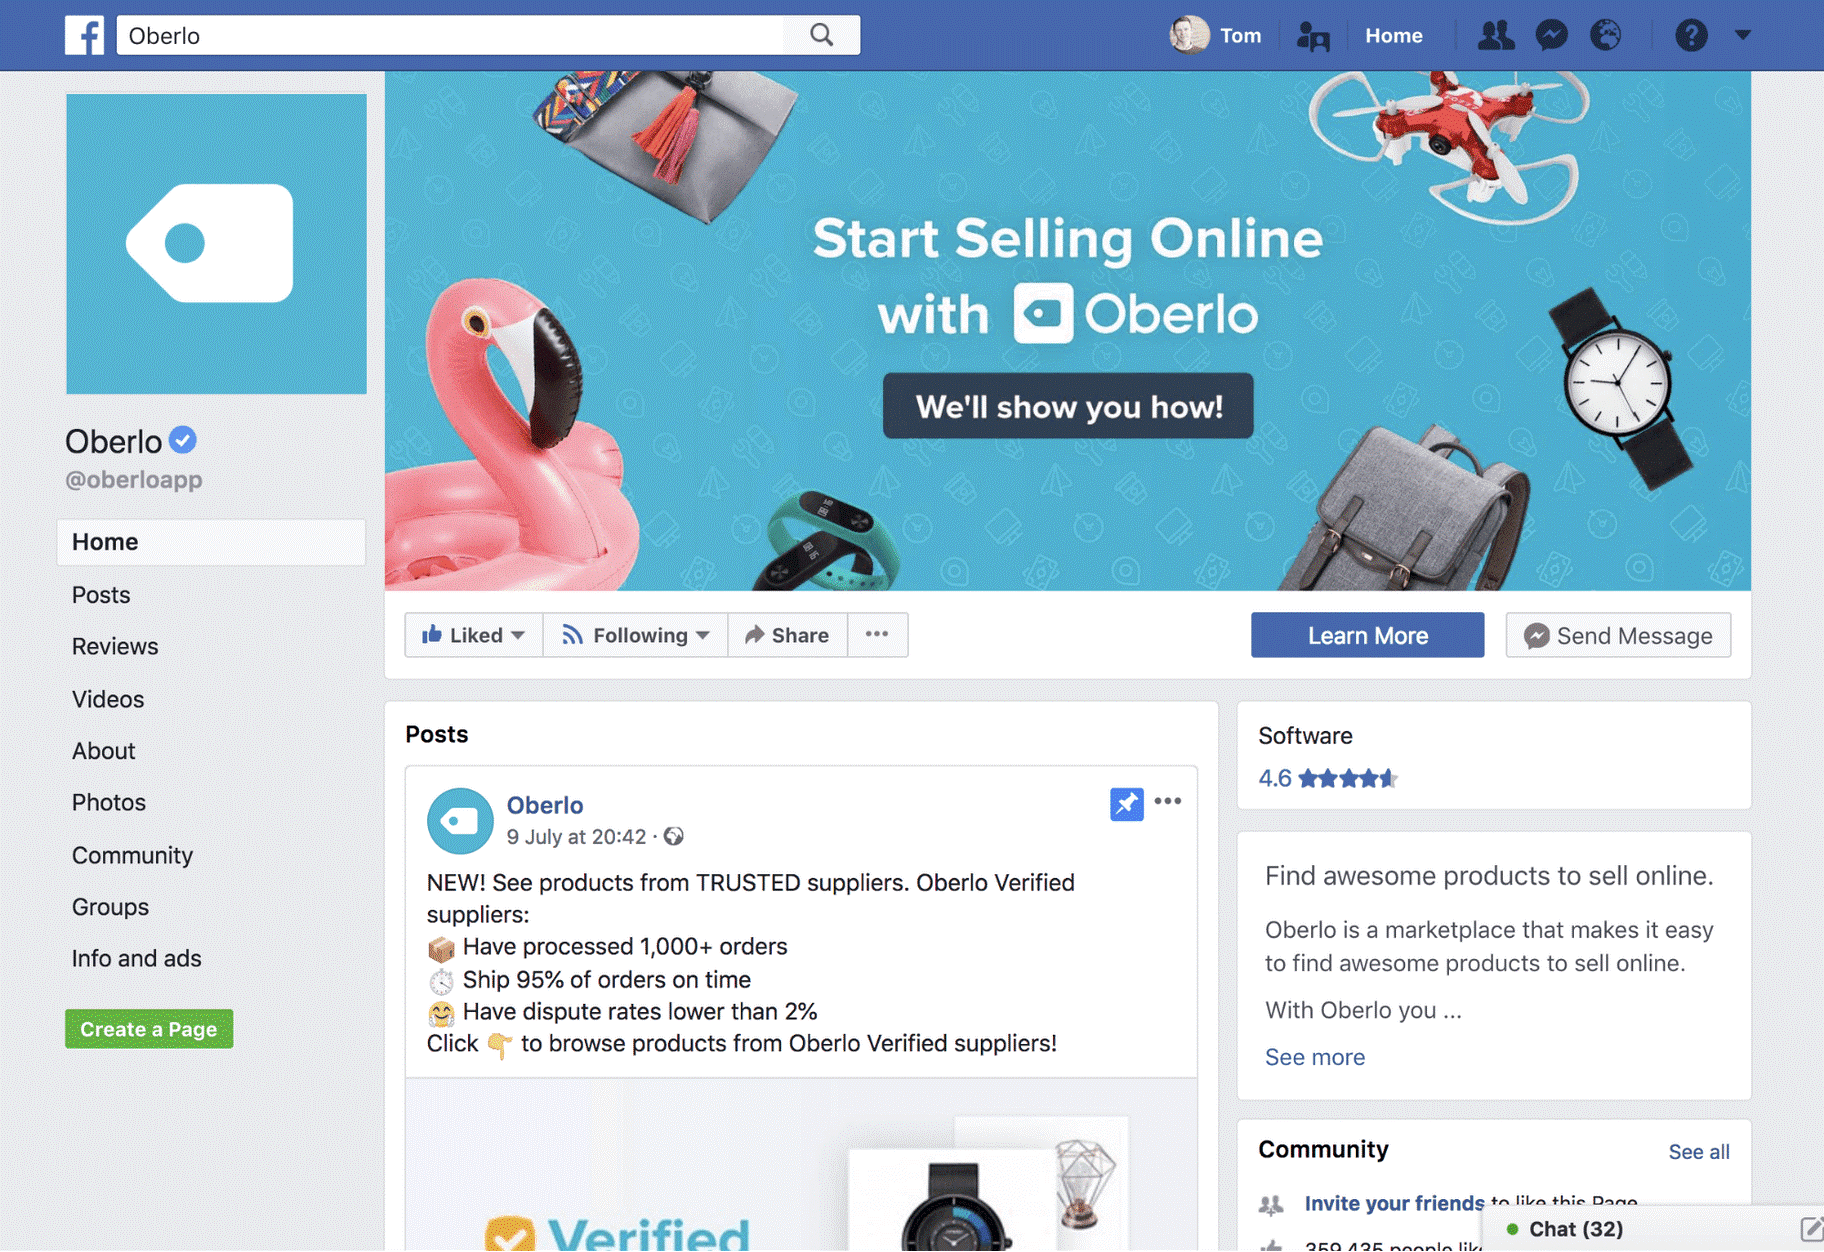
Click create Page@Username to set up your URL:
For example
The above username @oberloapp has been created for oberloapp.
Now people can easily search your page. People can also visit page Fb.me/oberloapp
Fill out your page information completely
Right in the middle of your Facebook page for business, you will see a few tips to complete your page setup.
Alternatively, to start filling out your business details, click edit page info in the top menu.
Here are the important things to fill out:
- Contact information: If you have any website, email address, or business phone number, add them here which you want to make public.
- Location: If you have a physical office/store, share your address here. It is important to mark your location correctly so that people may find you easily.
- Hours: Add business opening hours here. If you are open for selected hours, state them here.
- More: you may add extra information here like price range, privacy policy link, and more.

Tell your story on Facebook
Now, you have filled in all the details, but this is not much yet to tell people about your brand.
Why people should engage with your business on Facebook?
Luckily, there’s a section on the Facebook business page wherein you can add a longer description about your brand and business.
To add more information, click see more in the left menu, then click about, and then select our story on the right side.
Here, you can add more or detailed information about what your business offers and why people should like and follow your business page.
Offer a compelling reason for people to stick to your services.
Enter any headline and text for your story along with uploading a relevant photo.
When you are done, click Publish.
Add collaborators to your page
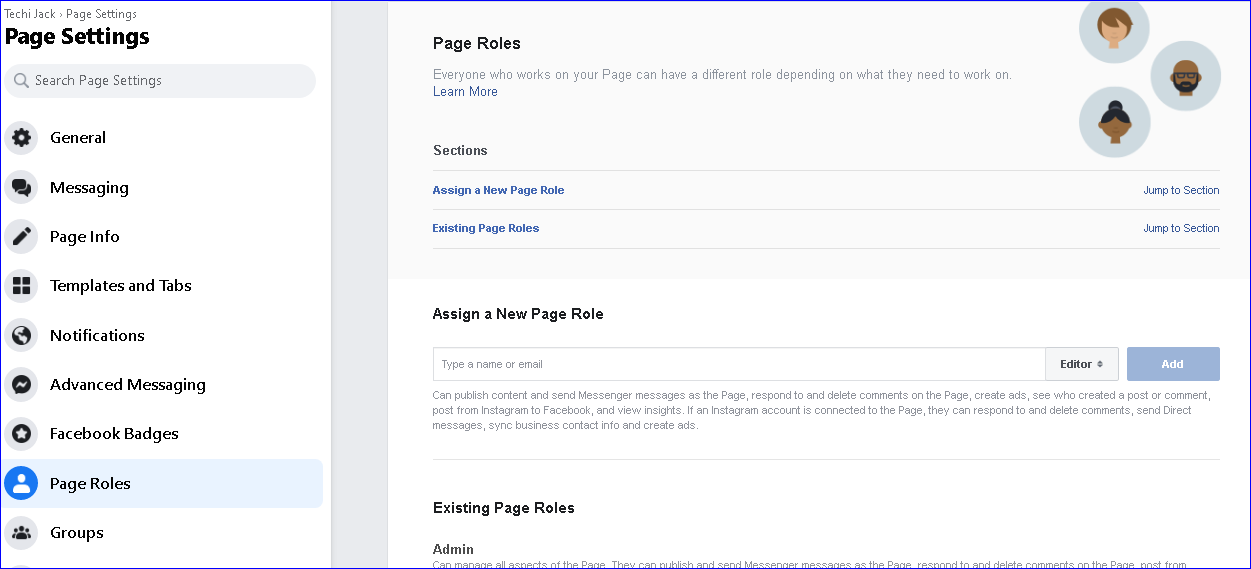
If you are planning to share the marketing duties with your team, then you have to grant access to different roles.
Here are the roles which you may choose from:
- Admin: Full access to everything
- Editor: Can edit page, send messages or post, create Facebook ads, and can see which admin has created the post, and view insights.
- Advertiser: Can create ads and view insights.
- Moderator: The role of a moderator is to respond and delete comments on the page. They can send messages and can see which admin created a particular post.
- Analyst: Can see the posts or comments and view insights.
To add collaborator, you can go to page settings and the page role section.
You can type the name of a friend or person to whom you want to give access to any of the above rights.
Create your first post
Before you start inviting people to like your Facebook page for business, you should post some valuable content there.
You can add content or a specific type of post as an event or product offer.
Make sure that whatever you post on your page offers value for your customers/visitors when they visit your page.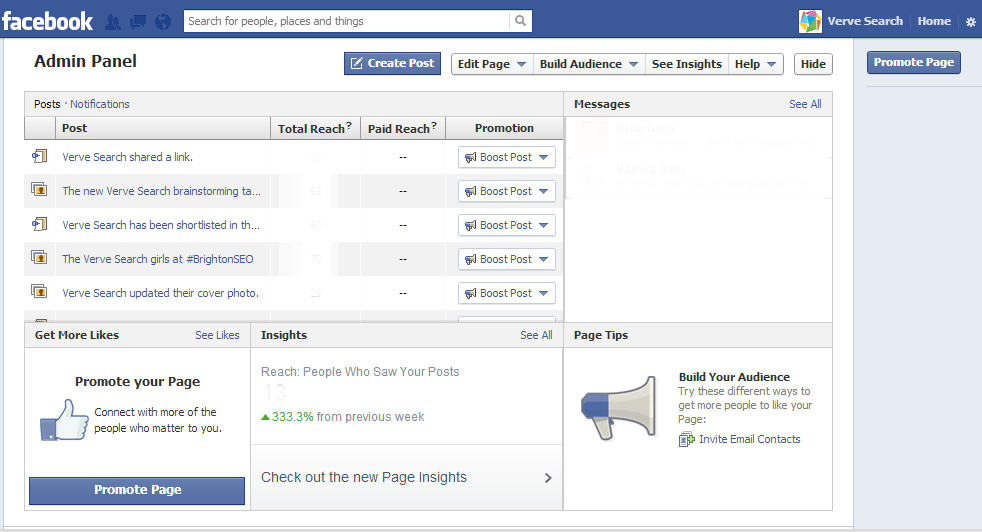
Now Invite the Audience to Your Facebook Page
Your Facebook business page now represents an online presence that will make potential customers feel comfortable while interacting with your business.
Tap on the Publish page button now.
Now, your Facebook Business Page is live and it’s time to invite your Facebook friends to like your business page.
Use other channels to promote it.
Add follow our logos on your promotional content and email signatures.
Therefore, ask your customers to review your brand and its services on Facebook.
Link your Facebook page from other web pages
Backlinks are important to help boost the credibility of your Facebook business page.
It may help improve your search engine rankings and direct new potential followers to your page.
Include a link to your page at the bottom of your post and wherever appropriate on other web pages.
Moreover, if you face any issues while creating your Facebook business page or Facebook Avatar.
Feel Free to contact us.

