Hyper-V Saved-Critical State | Delete Saved-Critical VM
Cannot Start VM - Hyper-V Failed to Change State
Table of Contents
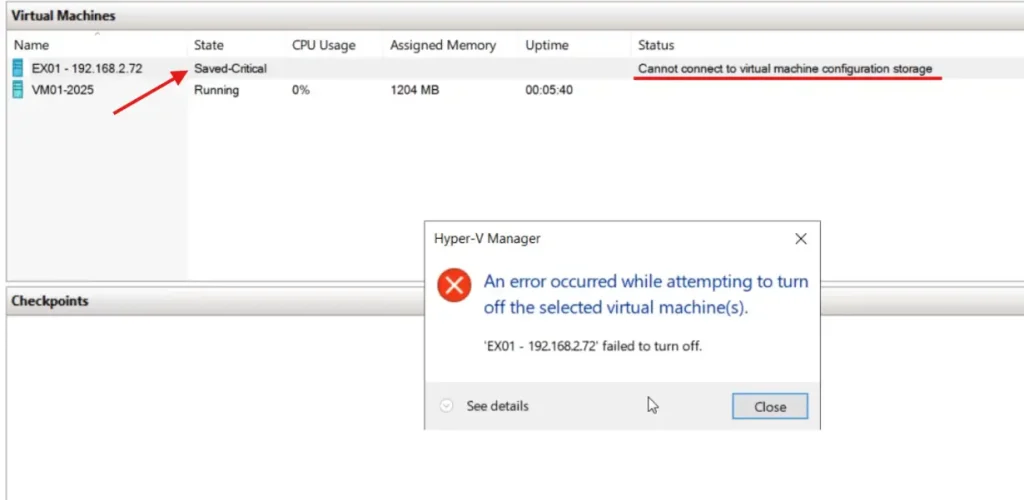
Hyper-V Saved-Critical VM Unable to Connect Configuration Storage
Friends, if you see the error Hyper-V Saved-Critical state on your Hyper-V manager.
Ensure that something went wrong with the Virtual Machine configuration or Storage.
Usually a Virtual Machine in Hyper-V enters this state due to a storage issue.
In Simple words, you can try to understand it in a way that, if the virtual disk of a VM is removed, it won’t start.
Same way if the hard drive fails on which your Virtual Machine was stored.
Therefore, in this situation, the VM is also unable to access the Storage of its virtual disk and will fail to boot.
Hyper-V manager will save your VM in a state of critical, i.e. “Saved-Critical”.
That’s why we see the Saved-Critical State of VM in Hyper-V Manager.
Now you cannot perform any action on VM such as start, turn off, shutdown, etc., none of them is going to work.
How to Fix Saved-Critical State of a VM
As we already know the cause of the issue.
To fix this, you should have a backup of the virtual disk of your VM, which is in a state of Saved-Critical
Replace the faulty hard drive with the same drive letter and restore your virtual machines VHD to a new HDD/SSD
Once you complete the above steps, you can try to start the VM from Hyper-V Manager and hopefully your virtual machine will be started.
How to Delete Saved-Critical Entry from Hyper-V Manager
In the above step, we saw how to restore the VM virtual disk to fix the issue.
However, if you do not have any backup for the VM, which is in a critical state, then what?
In this situation where there is no backup for the VM, we have to lose the VM and have to remove the stale entry for saved-critical from the Hyper-V manager.
If you try to delete this VM by doing a Right Click.
There will be no option to delete the VM.

To delete this Virtual Machine entry from the Hyper-V manager
We have to use the PowerShell.
Steps to Remove Critical State of a Virtual Machine
Open a PowerShell with Admin Rights
First, we will identify the Name of VMs available on our Hyper-V Server by running the cmdlet Get-VM
Get-VMName and state of the VM will be displayed as below.

Now you have to pick the name of your VM that has a state of Saved-Critical and run the following command.
As in our case, the name of our virtual machine is “EX01 – 192.168.2.72”, so we ran the cmdlet
Remove-VM –Name “EX01 – 192.168.2.72” –ForceAfter running the above cmdlet, the entry was removed successfully

Conclusion
In this post, we removed the entry of a Virtual machine that was in the state of Saved-Critical.
It is always recommended that, you keep the backup of your virtual machines, VHDs, so that they can be restored at any time.
Also follow the Microsoft best practice by using a failover cluster for the virtual machine role to make it highly available.
You may also like some more articles on Hyper-V
If you have any issue related to this post, feel free to contact.